Your members can add videos to your site themselves, from the front end, without ever seeing the Joomla administrator. You decide which groups may do it, what kinds of video they may add, and whether their submissions appear straight away or wait for you to approve them.
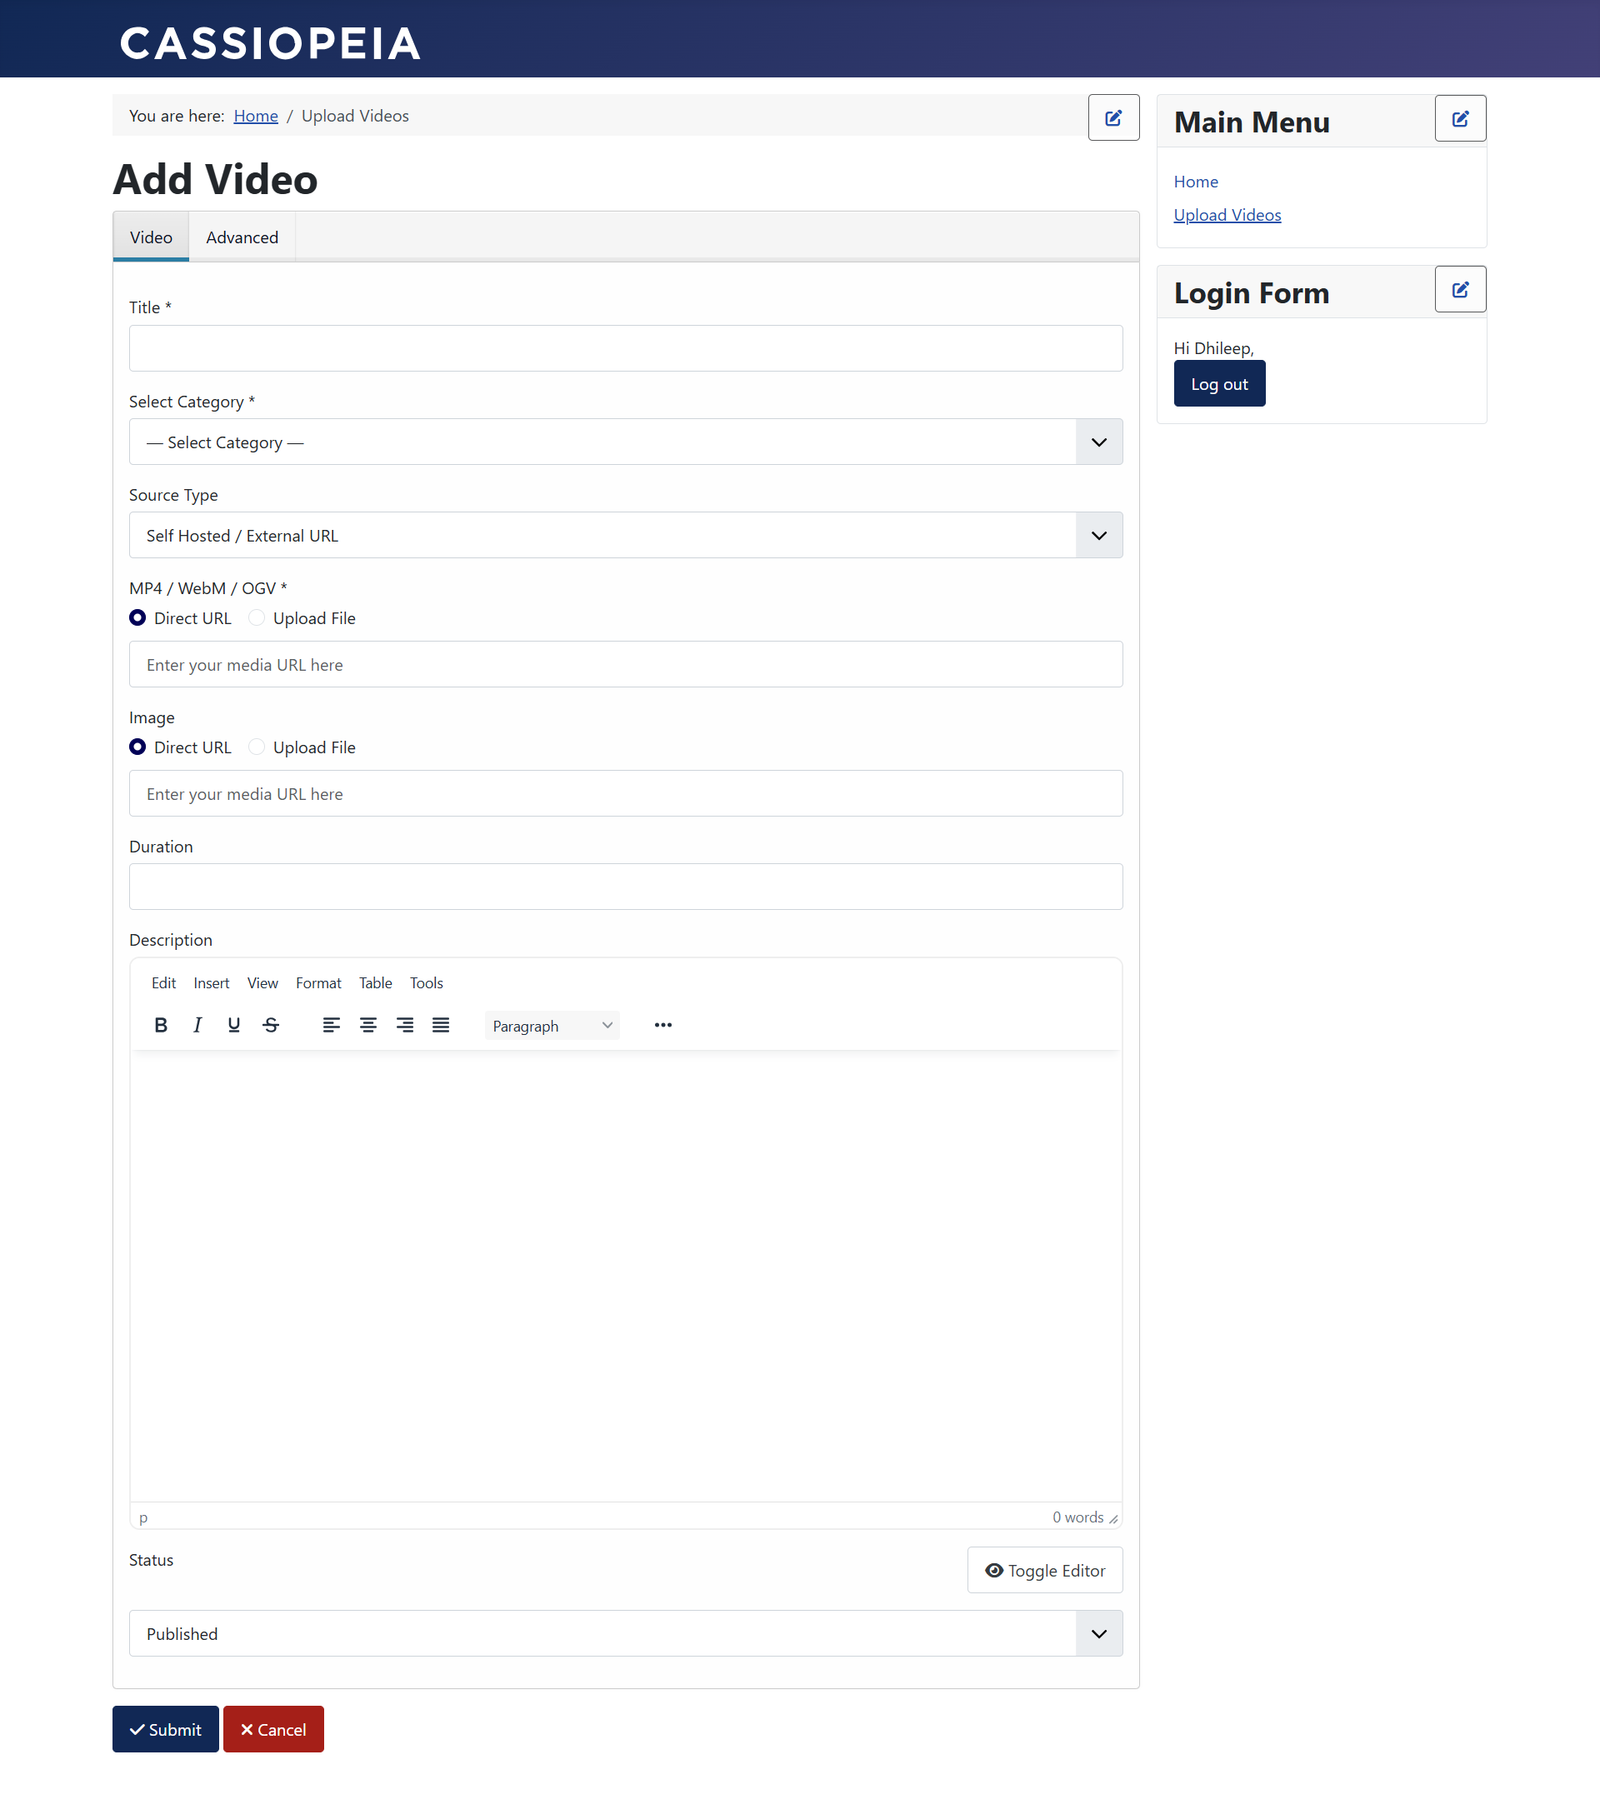
There are four steps, and they need doing in this order:
Step 1: Create a category
Every video must belong to a category, and Select Category is a required field on the submission form. If your site has no categories, your members cannot save anything — they fill in the form, press Save, and get a validation error they cannot do anything about.
Go to Components → Yendif Video Share → Categories and create at least one. If you already have categories from setting up your gallery, you are done — see Set up your first video gallery.
Members choose from all your published categories. There is no way to restrict a group to one category, so if you have categories you would rather they did not post into, expect to move the occasional video yourself.
Step 2: Give a group permission to submit
Nobody can submit anything until their user group is allowed to. This is the step people miss, and its symptom is a menu link that leads to a permission error.
1. Go to Components → Yendif Video Share → Videos and click Options at the top right.
2. Open the Permissions tab and select the group you want to allow, usually Registered.
3. Set the actions you want, then Save.
- Create — submit a new video. Required. Without it, nothing else on this page works.
- Delete — remove videos.
- Edit State — publish and unpublish. This is the approval switch — see Reviewing submissions below before you grant it.
- Edit Own — intended to allow editing only their own videos. Read the warning below before you rely on it as a boundary.
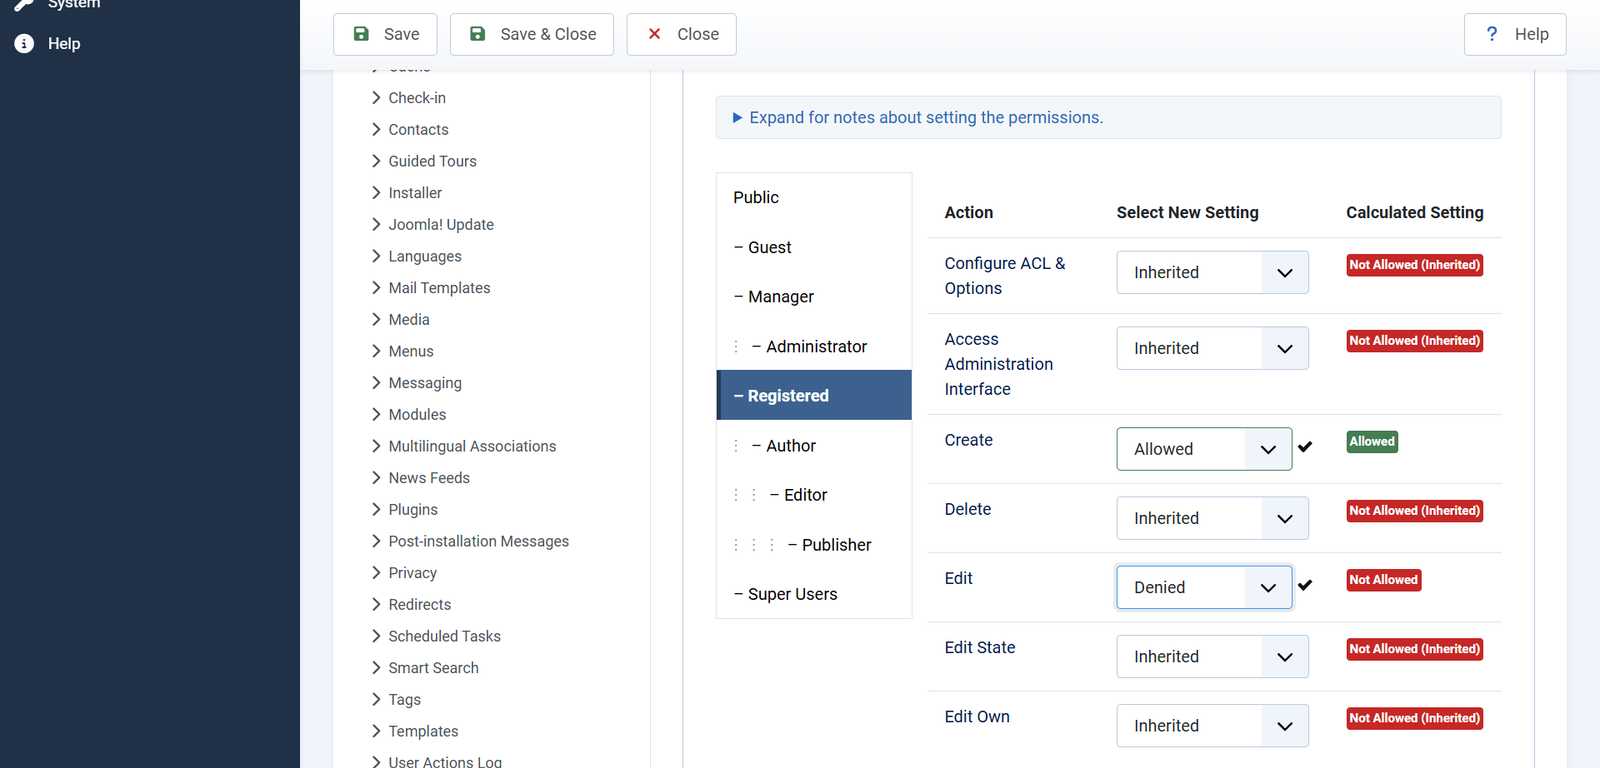
Front-end permissions are not scoped per author. A group allowed to submit videos can also open and change videos that other members submitted, and a group with Delete can remove them. Edit Own does not reliably limit someone to their own videos once they also have Create.
So treat Create as a grant over your whole video library, and give it only to people you would be willing to make editors. If you need genuinely separated contributors, each able to touch only their own videos, contact support before you build on this rather than assuming Edit Own covers it.
Step 3: Choose what they may submit
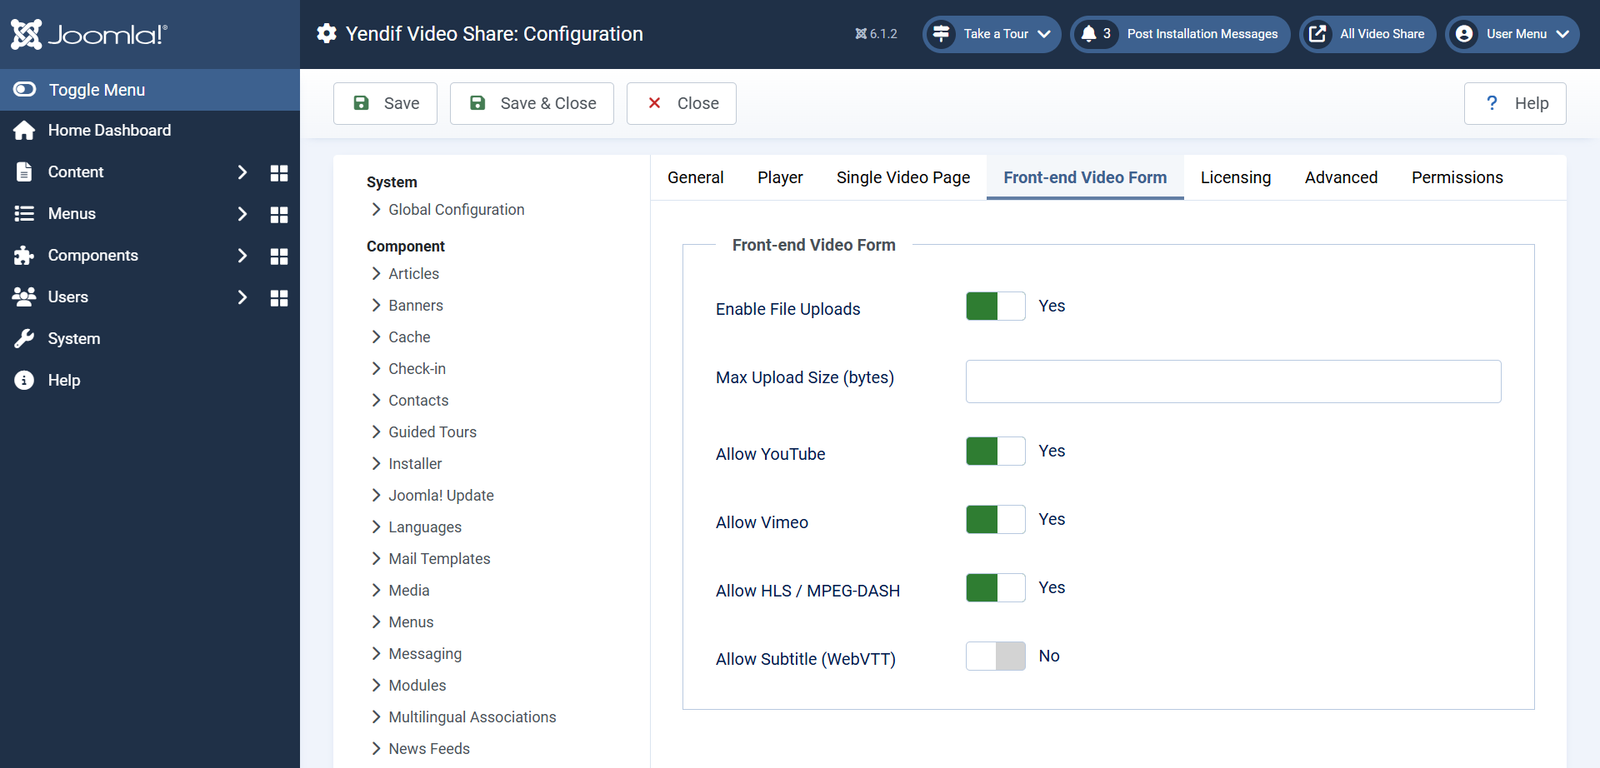
In the same Options screen, open the Front-end Video Form tab.
- Enable File Uploads — lets members upload a video file from their computer. Set to No, they can only link to a file already online. Default: Yes.
- Max Upload Size (bytes) — the largest file a member may upload. This is in bytes, so 50 MB is
52428800. Empty means your server’s own PHP limits apply. It only affects the front end; your own uploads in the administrator are not limited by it. Default: empty. - Allow YouTube — members may add a YouTube URL. Default: Yes.
- Allow Vimeo — members may add a Vimeo URL. Default: Yes.
- Allow HLS / MPEG-DASH — members may add a live or adaptive stream URL. Default: Yes.
- Allow Subtitle (WebVTT) — shows the captions field, so members can attach a subtitle file. Self hosted videos only. Default: No.
The Source Type selector only appears on the form when more than one source is available. Switch YouTube, Vimeo and HLS / MPEG-DASH all off and members simply see the video file fields, with no selector to choose from.
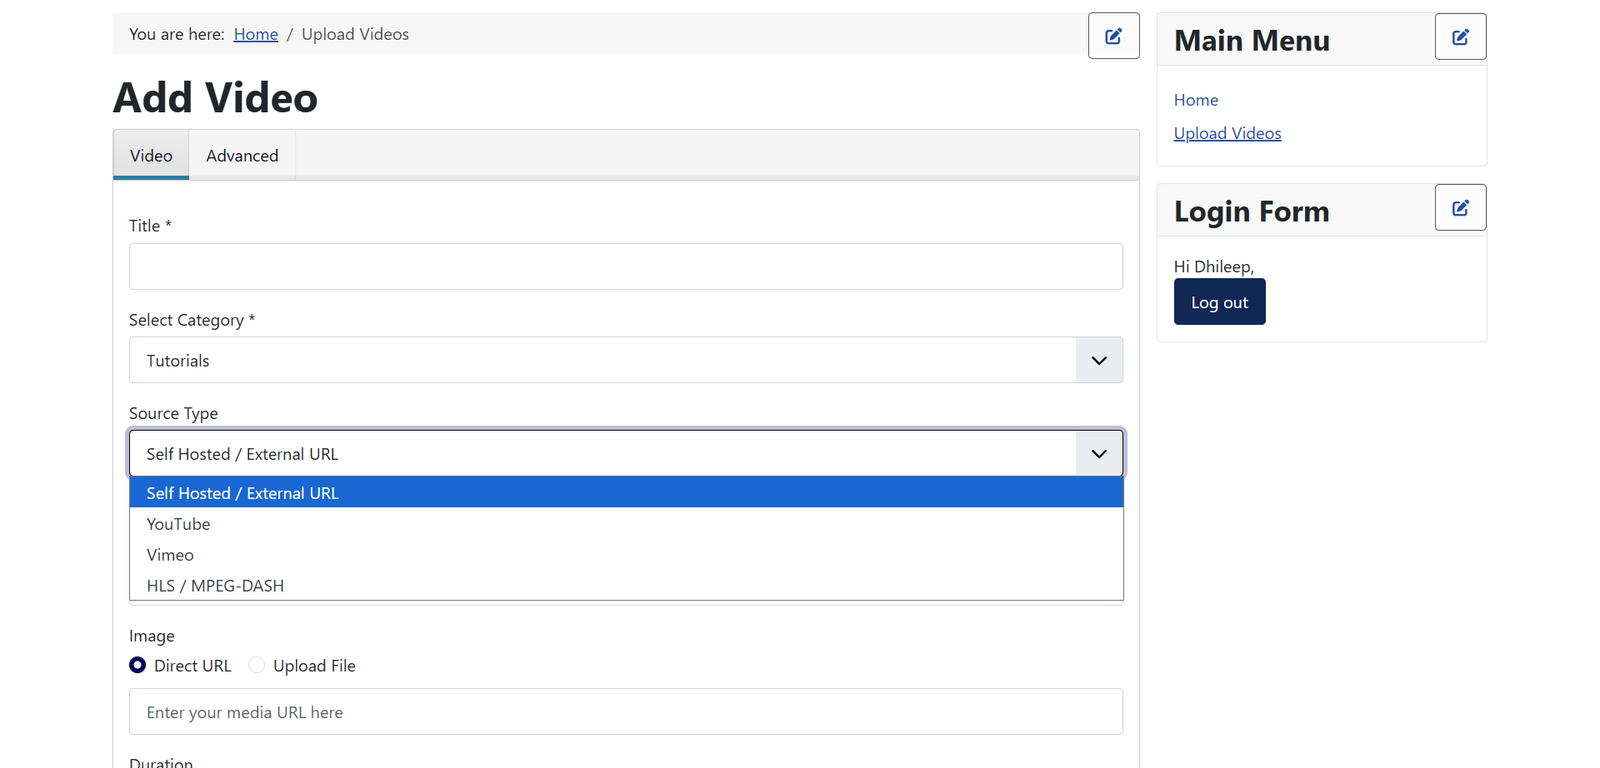
Iframe Embed Code is not offered on the front-end form. That source type exists in the administrator only, so members cannot paste arbitrary embed code into your site. This is deliberate — leave it that way.
Step 4: Add the menu items
Permission alone gives your members nowhere to go. They need menu items.
1. Go to Menus → Main Menu → New.
2. Click Select next to Menu Item Type and choose Yendif Video Share.
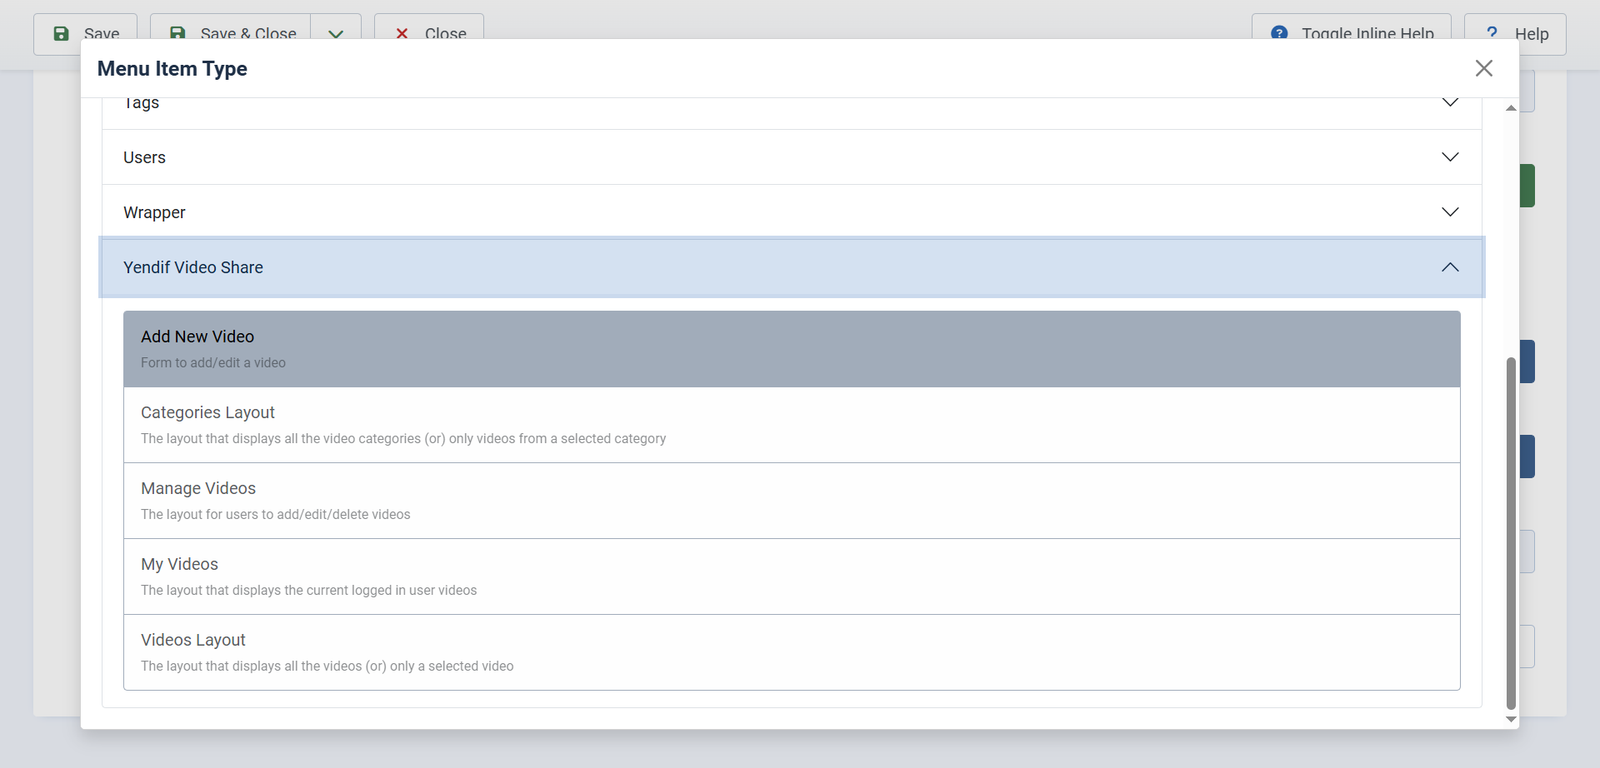
Five layouts are offered. Three of them are for your members:
- Add New Video — the submission form itself. This is the one members use to add a video.
- Manage Videos — a working list of the member’s own videos, where they can edit, publish and delete them. Add this one too. Members are sent here after they save, and without it they can add videos but never find them again.
- My Videos — a public-looking gallery of the logged-in member’s videos, laid out like any other gallery. This is for showing off a member’s collection, not for managing it. Optional.
The other two — Categories Layout and Videos Layout — are your ordinary public gallery pages, covered in Set up your first video gallery.
3. Choose Add New Video, fill in the Menu Item Details, and set Access to Registered so the link only shows to people who are logged in. Save.
4. Repeat for Manage Videos, again with Access set to Registered.
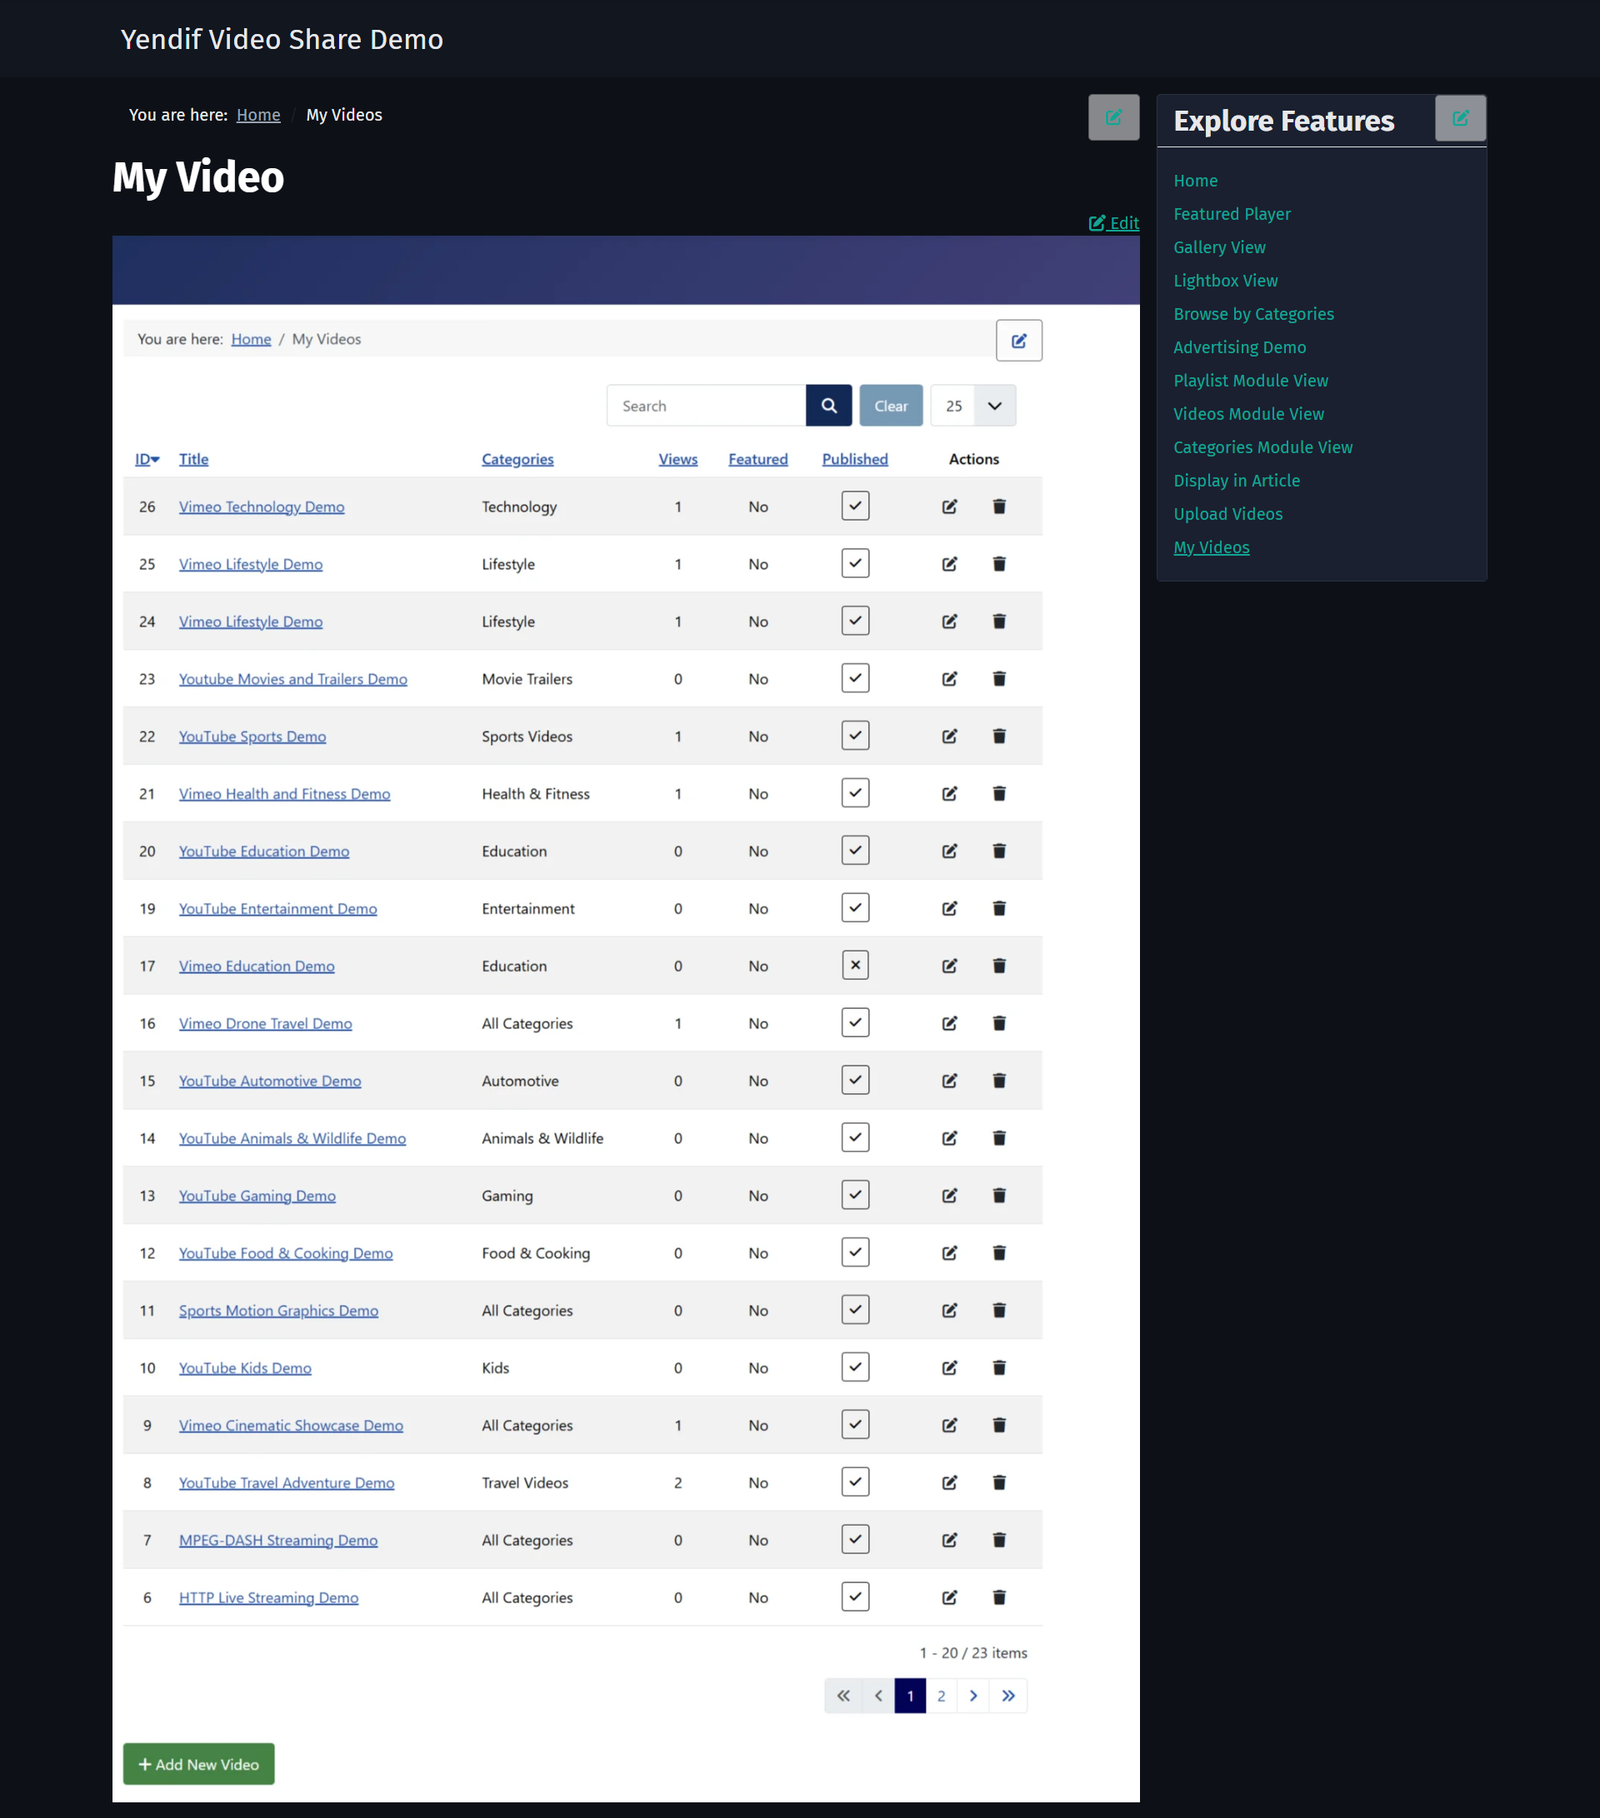
Check it worked: log in as a test member of that group, open the Add New Video page and submit something. You should land on Manage Videos with your new video listed.
Both pages are for logged-in users. Someone who is not logged in is sent to your login page first and returned to the form afterwards, so the link is safe to leave in a public menu — though setting Access to Registered is tidier, because then guests never see a link they cannot use.
Reviewing submissions before they appear
There is no setting called “moderation” or “auto approve”. The Edit State permission is what decides it, and the effect is worth understanding because it is not obvious from the label.
Edit State denied — submissions wait for you
- The Status field on the form is shown as plain text the member cannot change.
- A new submission is saved Unpublished. Nobody sees it on your site.
- You publish it from Components → Yendif Video Share → Videos when you are happy with it.
- The member can still see and edit it from their Manage Videos page while it waits.
Edit State allowed — submissions go live immediately
- The member gets a real Status dropdown, which starts on Published.
- Their video is on your site the moment they press Save, with no review.
- They can publish and unpublish from their Manage Videos page as well.
- If Schedule Video Publishing is on under Options → General, they also get Start Publishing and Finish Publishing dates.
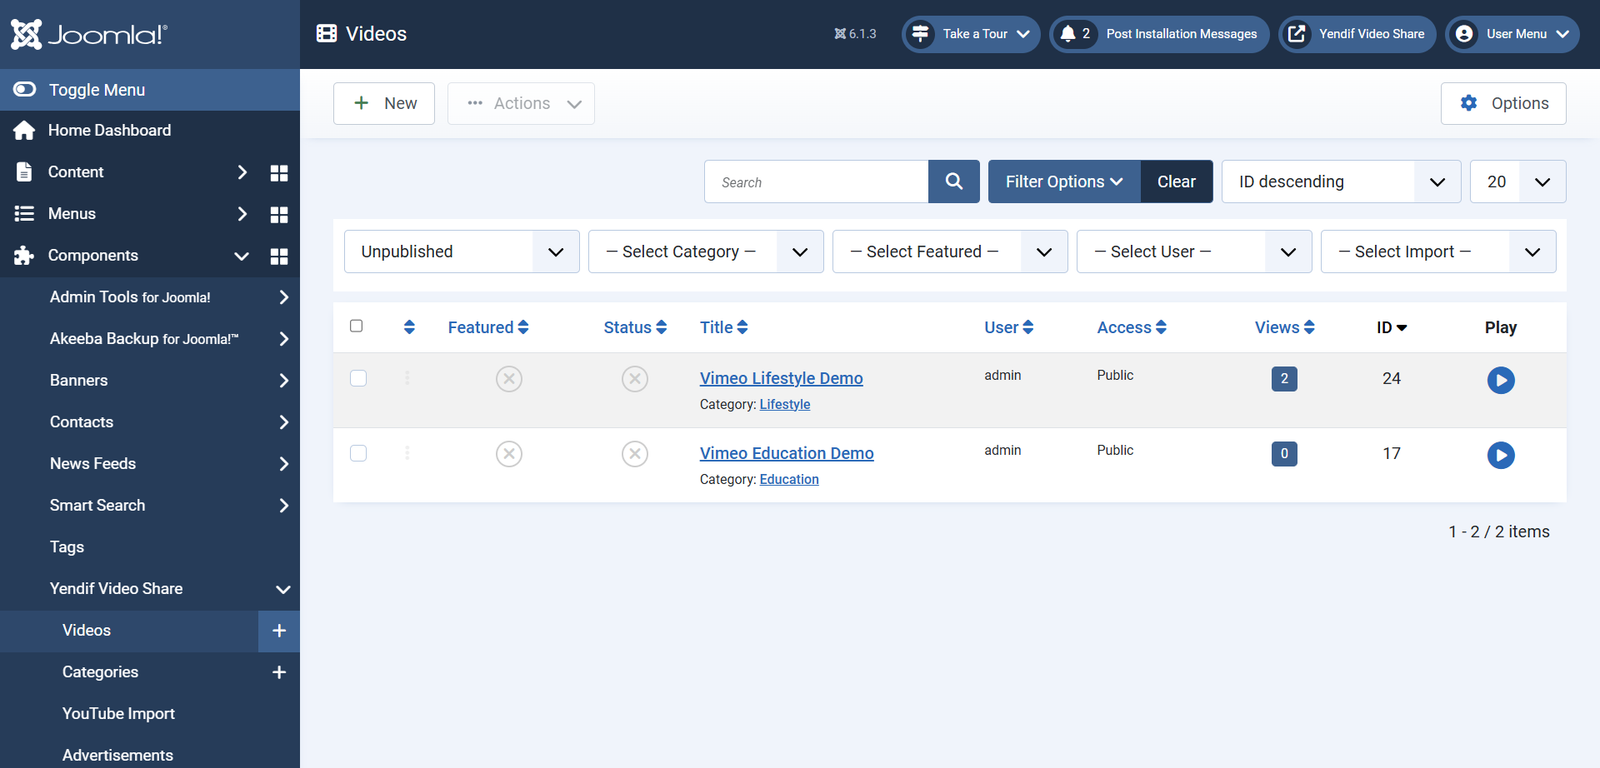
To find what is waiting, open the videos list and set the Status filter to Unpublished. There is no notification when something is submitted, so make checking part of your routine, or you will keep members waiting without knowing it.
What happens to uploaded files
Uploads are checked twice before they are accepted: the type your member’s browser declares, and then the file’s actual contents. A file that claims to be a video but is not gets rejected.
- Accepted for the main video field — MP4, WebM, OGG and QuickTime video.
- The WebM and OGV fields are stricter, taking only their own format.
- Stored under
media/com_yendifvideoshare/uploads/videos/, in a folder named for the year and month. - Filenames are cleaned up — anything that is not a letter or a number becomes a hyphen, and the extension is kept.
- An existing file is never overwritten by an upload with the same name.
When a video is deleted, only files that were uploaded through the form are removed with it. A video that was added by URL leaves the file alone, on the reasonable assumption that something else may be using it.
Video files are large and members are optimistic. Before you open uploads to a big group, check
upload_max_filesize,post_max_sizeandmax_execution_timeon your server, and set Max Upload Size to something your hosting can actually absorb. Watch your disk space too — a video library grows faster than anything else on a site.
If something goes wrong
- Members get a permission error on the form. Their group is not allowed Create. Set it under Options → Permissions, on the group they actually belong to — remember that permissions are inherited, so check the parent group too.
- The form saves nothing and shows a validation error. A required field is empty. Almost always Select Category, and almost always because your site has no categories yet. See Step 1.
- Members submit a video and never see it again. There is no Manage Videos menu item. Add one.
- Submissions go live without review. The group is allowed Edit State. Deny it — see Reviewing submissions.
- Submissions never appear even after you publish them. Check the video’s category is published too. An unpublished category hides everything inside it.
- There is no upload field on the form. Enable File Uploads is set to No, so only the URL field is offered.
- “File size should not be greater than…” The file is over Max Upload Size. Remember that setting is in bytes — a value like
50means fifty bytes, and nothing will ever upload. - “This filetype is not allowed” on a video that plays fine. The file is not one of the accepted types, or its contents do not match its extension. Re-encode as standard H.264 MP4, or add it by URL instead.
- The upload fails or times out with no message. Your server’s PHP limits. Raise
upload_max_filesize,post_max_sizeandmax_execution_time. - “Error moving file”. The uploads folder is not writable. Check permissions on
media/com_yendifvideoshare/uploads/. - No Source Type selector on the form. Only one source is allowed. Turn on YouTube, Vimeo or HLS / MPEG-DASH to get the selector back.
- No captions field. Allow Subtitle (WebVTT) is off, or the member chose a source other than a self hosted video.
- A member’s video vanished from their Manage Videos page. The list is keyed on the video’s Select User field. If you changed that in the administrator, the video moved to the other member’s list.
- A video shows a padlock and the member cannot edit it. It is checked out, because somebody opened it and never saved or cancelled. Use System → Global Check-in.
What to try next
- Restrict videos to registered members
To control who can watch, as well as who can submit. - Get visitors rating and discussing your videos
To let your members respond to each other’s videos. - Change how your gallery looks
To lay out the My Videos page and your galleries. - Settings reference
To look up any setting in detail. - Troubleshooting
To find any other symptom and what to do about it.